How to Choose and Replace Your Kitchen Faucet or Bathroom Vanity Fixture
A new faucet can make a sink feel cleaner, work better, and look more finished. The catch is that a faucet is not just a style choice. It has to fit the sink, connect to the existing plumbing, and hold up to daily use.
The good news is that replacing a kitchen faucet or bathroom vanity faucet is one of the more approachable plumbing projects for a careful DIYer. The job is easier when the new fixture matches the old setup, the shutoff valves work, and there is enough space under the sink to move a wrench.
This guide walks through how to choose the right fixture, what to check before buying, and how to handle a basic replacement without turning a simple upgrade into a leak hunt.

Choose a faucet that fits the sink and the way it gets used
The best faucet is the one that fits both the sink and the routine around it. A kitchen sink that handles big pots needs a different fixture than a powder room vanity used mainly for handwashing.
Start with the room and the job.
A kitchen faucet usually benefits from more reach, more height, and easier rinsing. Pull-down and pull-out sprayers are popular because they make cleanup faster. A taller gooseneck spout can help with stockpots and baking sheets, but it can splash more in a shallow sink.
A bathroom vanity fixture usually needs a lower profile and a comfortable handwashing position. Style matters more here because the faucet is close to eye level and often paired with cabinet hardware, mirrors, and light fixtures. Still, function comes first. The spout should reach far enough into the basin so water lands near the drain, not against the back wall of the sink.
Before picking a finish or shape, identify the mounting style.
Common faucet setups include:
Single-hole faucets
One hole in the sink or countertop. These are common in newer kitchens and vanities. Many include an optional deck plate to cover extra holes.
Centerset bathroom faucets
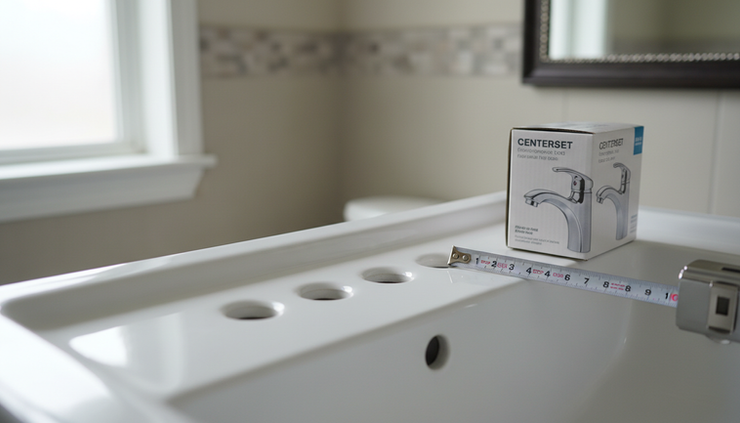
Usually made for three holes spaced 4 inches apart. The handles and spout sit on one compact base.
Widespread bathroom faucets
Three separate pieces, usually with wider spacing between handles. These offer a more custom look but take longer to install.
Bridge and wall-mount faucets
These can look great, but they are less forgiving. Wall-mount faucets require the plumbing inside the wall to line up correctly.
For an easier replacement, match the new fixture to the existing hole pattern. A deck plate can help cover unused holes, but it cannot create space where the countertop does not have it.
Measure before you shop
Measure the sink or countertop before buying. Check:
Number of faucet holes
Distance between holes
Thickness of the sink deck or countertop
Clearance behind the faucet
Space under the sink for mounting hardware
Distance from the spout outlet to the drain area
For kitchen faucets, also check cabinet depth and sink size. A tall faucet under a low window sill may not fit. A wide pull-down hose weight may hit drain pipes, a garbage disposal, or cleaning supplies stored under the sink.
For bathroom vanities, check medicine cabinets, backsplashes, and mirrors. Handles need room to turn without hitting the wall.
Compare materials, valves, finishes, and features
Two faucets can look similar online and feel very different in daily use. Look past the finish photo and read the product details.
The valve is one of the most important parts. Many modern faucets use ceramic disc cartridges, which tend to hold up well and give smooth control. Compression-style parts are more common on older fixtures and may need washer replacement over time.
Body material matters too. Solid brass, stainless steel, and high-quality metal construction usually feel heavier and last longer than lightweight plastic parts. Some plastic parts are normal, especially in sprayer heads or internal connectors, but the mounting hardware should feel strong.
Finishes vary by care needs.
Finish | Where it works well | What to know |
Chrome | Bathrooms, modern kitchens | Bright, easy to match, shows water spots |
Brushed nickel | Kitchens and baths | Soft look, hides fingerprints better |
Matte black | Modern or farmhouse spaces | Bold style, may show mineral buildup |
Stainless steel | Kitchens | Coordinates well with appliances |
Oil-rubbed bronze | Traditional bathrooms | Finish tone can vary by brand |
Think about water quality too. Homes with hard water may see mineral buildup faster, especially on darker finishes and aerators. If the old faucet had crusty buildup around the base, choose a design that is easy to wipe down.
Pick features that solve real problems
More features do not always mean a better faucet. Choose the ones that help every week.
Good kitchen features include:
Pull-down sprayer with a strong retraction system
Button or toggle for spray and stream
Spout that swivels far enough for the sink layout
Docking system that holds the sprayer firmly
Supply lines included in the box
Good bathroom features include:
Smooth handle movement
Faucet height that fits the basin
Drain assembly included, if needed
Handles that are easy to grip
Finish that matches towel bars and cabinet hardware
If replacing a bathroom vanity plumbing fixture, check whether the drain assembly must be replaced too. Many bathroom faucet kits include a pop-up drain, but the style can vary. Some use a lift rod behind the faucet. Others use a push-button drain. Make sure the drain works with the sink’s overflow opening if the basin has one.
Gather the right tools and prepare the workspace
The hardest part of faucet replacement is often not the new fixture. It is removing the old one in a cramped cabinet.
Before starting, gather:
Adjustable wrench
Basin wrench
Channel-lock pliers
Bucket or small pan
Towels or rags
Flashlight or headlamp
Plumber’s tape, if the fixture instructions call for it
Putty knife or plastic scraper
Mild cleaner
Silicone sealant, if required by the manufacturer
Read the faucet instructions before removing anything. Some fixtures use a rubber gasket at the base. Others call for a thin bead of silicone. Plumber’s putty is not right for every surface, especially some stone countertops and certain drain parts, so follow the instructions that came with the fixture.
Clear out the cabinet. Place a towel on the cabinet floor and keep a bucket under the supply connections. Even after shutting off the water, supply lines can hold water.
Next, test the shutoff valves.
Turn the hot and cold valves clockwise until they stop. Open the faucet to release pressure. If water continues to run, the shutoff valves may not be closing fully. At that point, stop and decide whether to shut off water to the home or call a plumber.
Do not force old shutoff valves. If a valve is corroded, stuck, or leaking from the stem, the faucet replacement may need to include valve repair or replacement.
Take a phone photo of the plumbing before disconnecting anything. It gives you a quick reference if the cabinet is tight or the lines cross behind the drain.

Remove the old fixture and install the new one
Once the water is off and the faucet is open, disconnect the supply lines from the shutoff valves or from the faucet tails, depending on the setup. Keep the bucket close.
Use a basin wrench to loosen the mounting nuts under the faucet. These nuts can be awkward because they sit high behind the sink bowl. If they are badly corroded, apply patience before force. Twisting too hard can damage thin sink decks or supply tubes.
After the nuts are off, lift the old faucet out from above. Scrape away old sealant or mineral buildup with a plastic scraper, then clean and dry the surface. The new faucet will seal better on a clean deck.
Install in the right order
The exact sequence can vary, but most sink-mounted faucets follow this pattern:
Set the gasket, deck plate, or sealant as directed.
Lower the faucet body into the mounting hole.
From below, install the washer and mounting nut.
Align the faucet from above.
Tighten the mounting hardware from below.
Connect the hot and cold supply lines.
Attach the sprayer hose and weight, if the faucet has one.
Install or connect the drain assembly if replacing a bathroom faucet.
Remove the aerator before flushing the lines.
10. Turn the water on slowly and check for leaks.
Do not overtighten. A secure faucet should not wobble, but too much force can crack a sink, bend thin metal, or damage a gasket.
For kitchen faucets with pull-down sprayers, make sure the hose moves freely. The weight should hang below the sink without catching on the P-trap, valves, disposal, or stored items. Pull the sprayer out several times before calling the job done.
For bathroom faucets, take extra care with the drain. A leak at the drain flange or P-trap can hide in the vanity and damage the cabinet floor. After installing the drain, run water and fill the basin partway. Release the stopper and watch every joint as water drains.
Flush and test the fixture
Before normal use, flush the faucet. With the aerator removed, run hot and cold water for a short time to clear loose debris from the lines. Then reinstall the aerator.
Check for leaks in three rounds:
Right after turning the water back on
After running hot and cold water
Again after 15 to 30 minutes
Use a dry paper towel around each connection. It will show small leaks faster than a fingertip.
Know when to pause and call a plumber
A straightforward faucet swap can become a bigger plumbing repair if old parts fail. Calling a plumber is the safer choice if you find:
Shutoff valves that do not close
Active leaks at the valves or supply pipes
Corroded copper, galvanized, or threaded connections
Water damage inside the cabinet
A cracked sink or countertop
No room to access the mounting hardware
Wall-mounted faucet plumbing that does not line up
A drain assembly that will not seal after careful adjustment
Older homes can have mixed plumbing materials from past repairs. If the connection looks unusual or fragile, do not guess. A small broken valve or pipe can cause more damage than the faucet ever cost.
There is also no shame in hiring help for tight spaces. Some under-sink cabinets are cramped enough that even a simple nut takes time, special tools, and a lot of patience.

A good replacement is measured twice and tightened once
Choosing and replacing a faucet goes best when the new fixture matches the sink, the plumbing is in good shape, and the workspace is prepared before the old faucet comes out.
Start with the hole pattern, clearance, and daily use. Then compare materials, valves, finish, and included parts. During installation, take your time with shutoff valves, mounting hardware, supply lines, and drain seals.
A clean, steady faucet with no drips under the sink is the goal. If you reach that point, the upgrade is more than cosmetic. It makes the sink easier to use every day, and it protects the cabinet from the slow damage that hidden leaks can cause.


Comments